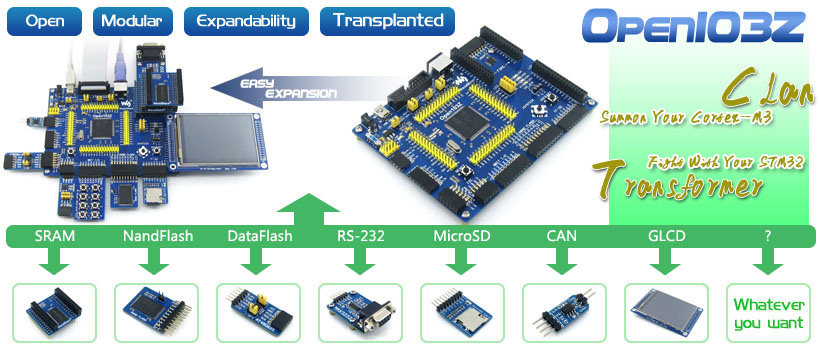
Open103Z ARM development board
The STM32 development board designed for STM32F103Z series features the STM32F103ZET6 MCU and integrates various standard interfaces. Adding additional peripherals that are required is easy.
Research Links
Purchasing Links
- Alibaba: Open103Z
- Alibaba: STM32F103ZET6 STM32F103 STM32 ARM Cortex-M3 Development Board + 12pcs Accessory Modules= Open103Z Package B

-
STM32F103ZET6:the high performance STM32 MCU in LQFP144 package which features
- Core: ARM Cortex-M3 32-bit RISC;
- Operating Frequency: 72MHz, 1.25 DMIPS/MHz
- I/Os: 112;
- Operating Voltage: 2-3.6V;
- Memories: 512K Flash, 64K RAM (the highest specification in STM32F103Z series);
- Communication Interfaces: 3xSPI, 5xUSART, 2xI2S, 2xI2C, 1xFSMC, 1xLCD, 1xSDIO, 1xUSB, 1xCAN;
- AD & DA converters: 3xAD (12bit, 1μs, shares 21 channels); 2xDA (12bit);
- Debugging/Programming: supports JTAG/SWD (serial wire debug) interfaces, supports IAP;
- 74LVC139: Used for FSMC expansion, makes it possible to connect multi peripherals through FSMC at the same time, such as connecting a LCD and a NAND FLASH;
- AMS1117-3.3: 3.3V voltage regulator;
- Power supply switch: 5V DC or USB;
- Power indicator;
- LEDs: Convenient for indicating I/O status or program debugging running state;
- Reset button;
- User key;
- Joystick: Convenient for I/O input (five positions);
- 32.768K crystal oscillator: for internal RTC;
- 8M crystal oscillator: enables the MCU run at 72M frequency by frequency multiplication;
- SDIO Interface: connects to the Micro SD Board easily, It is much faster to read/write the Micro SD card via SDIO than via SPI;
- 8 I/O Interface: easily connects to keypad, motor, etc;
- CAN Interface: communicates with accessory boards which feature the CAN device conveniently;
- SPI Interface: easily connects to SPI peripherals such as FLASH (AT45DBxx), SD card, MP3, etc;
- I2C Interface: easily connects to I2C peripherals such as I/O expander(PCF8574), EEPROM (AT24Cxx), etc;
- NAND FLASH Interface: easily connects to the NAND FLASH peripherals;
- LCD Interface: easily connects to the touch screen LCD;
- ONE-WIRE Interface: easily connects to ONE-WIRE devices (TO-92 package), such as temperature sensor (DS18B20), electronic registration number (DS2401), etc.
- PS/2 Interface: easily connects to PS/2 keyboard or mouse;
- USART1 Interface: easily connects to RS232, RS485, USB TO 232;
- USART2 Interface: easily connects to RS232, RS485, USB TO 232;
- FSMC Interface: easily connects to FSMC interface, such as NorFlash (S29GL128P), SRAM (IS62WV51216BLL);
- USB Port: USB communication between board and PC;
- 5V DC jack;
- 5V/3.3 V power input/output;
- MCU pins connector: all the MCU pins are accessible on expansion connectors for further expansion;
- JTAG/SWD interface: for debugging/programming;
- Boot Mode Selection: for configuring the BOOT0 and BOOT1 pins;
-
USB Enable Jumper
- Short the jumper to enable the PC auto detection while USB connecting
- Open the jumper to disable;
-
PS/2 Interface Jumper
- short the jumper to connect the PS/2 device to default I/Os;
- Open the jumper to connect the PS/2 device to custom I/Os via DuPont wires;
-
LEDs Jumper
- Short the jumper to connect the LEDs to default I/Os;
- Open the jumper to connect the LEDs to custom I/Os via DuPont wires;
-
VBAT Selection Jumper
- Short the jumper to use system power supply;
- Open the jumper to connect the VBAT to external power, such as battery;